Home > Training > Application Administrator > Faculty Separated Data Import
Faculty Separation Data Import
This article provides an overview of how to separate faculty using data upload in UC OATS. You have the option of separating staff manually in UC OATS or by data import. If you have several staff to separate, data import will save you time. The following will provide you with step-by-step instructions on how to separate faculty using data import.
Data Preparation
To prepare for the faculty data import:
- Download the Faculty Separation Import Template.
Please note:- The data sheets generated are multi-record data sets, not flat files. Multiple rows of data can apply to a single faculty member.
- Multiple faculty records are associated with an individual by using the UC PATH ID.
- All columns, not marked as deprecated, are required in the file. The value for the column can be empty if it is designated as “Required=N”.
- Review the Faculty Separation data element descriptions below and complete the Faculty Separation Import Template. Once you have finished editing the file, save it as a "Text (Tab-delimited) (*.txt) file.
Faculty Data Elements Description:
| Data Element Name | Description | Max size | Required (Y/N) | Accepted Format | Example | Note |
|
UCpath_ |
UCPATH employee ID |
500 characters | Y | Numeric | 12345678 | |
|
emp_email |
University email address used by the faculty. Faculty emails are used for automated emails from UC OATS. This is limited to one email address per faculty member. |
100 characters | Y | Email address | user@ campus.edu |
Limited to one email per faculty |
|
separation_date |
Provide the date the faculty member separated from the university. | Y | MM/DD/YYYY |
01/15/2023 |
|
|
|
reason |
Enter the reason for the separation. The reasons can be any of the following:
|
30 characters | Y | Text | separated | |
| enable_annual_certification | Select if you would like to enable annual certification. When you enable annual certification, an email reminder will be sent to the faculty. | 1 digit | Y | 0 = Do not enable annual certification 1 = Enable and send annual certification reminder email |
1 |
The following email template will be sent to the faculty if you entered 1: “Faculty Separated with Annual Certification Enabled” |
Import Data File
To import the faculty separation data file:
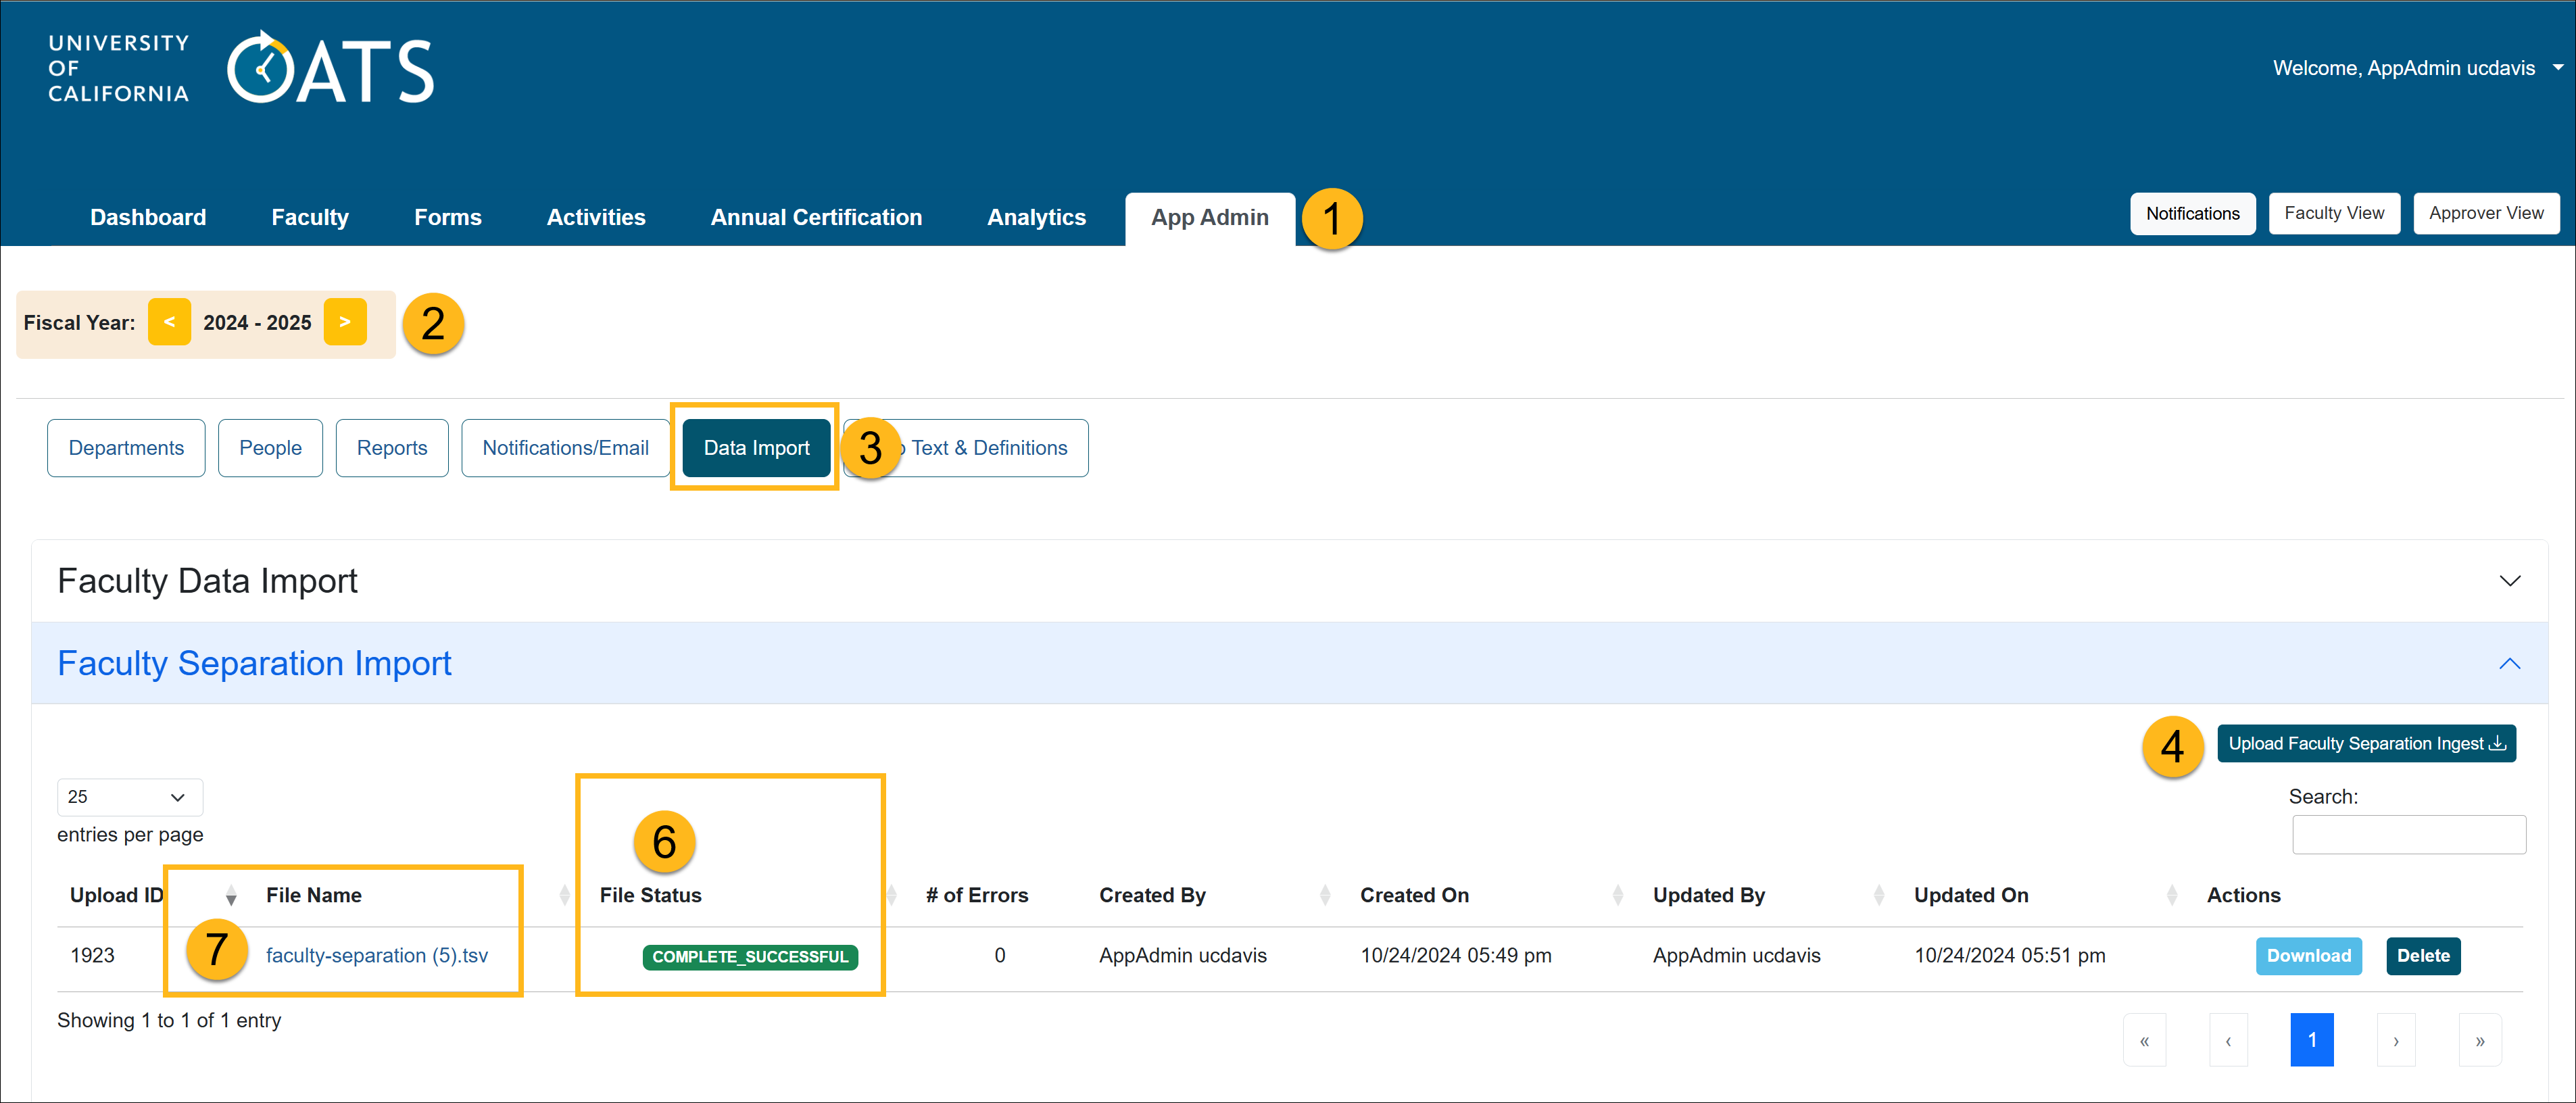
- Select the App Admin tab.

- Confirm you are in the correct fiscal year. You can move forward and back through fiscal years by clicking the arrows.
- Select the Data Import button and open the Faculty Separation Import section.
- Click on the Upload Faculty Separation Ingest button.
- Select the Choose File button and locate your data file. Make sure it is a "Text (Tab delimited) (*.txt) file. Then click Upload.

- The system will process your file and one of the following statuses will appear:
- Valid and processed / Complete Successful - The file was successfully uploaded and processed. The changes will be reflected in UC OATS.
- Invalid - There is an issue with the file:
- The file is not in "Text (Tab delimited) (*.txt) file format
- There is no data in the file
- File columns have been removed
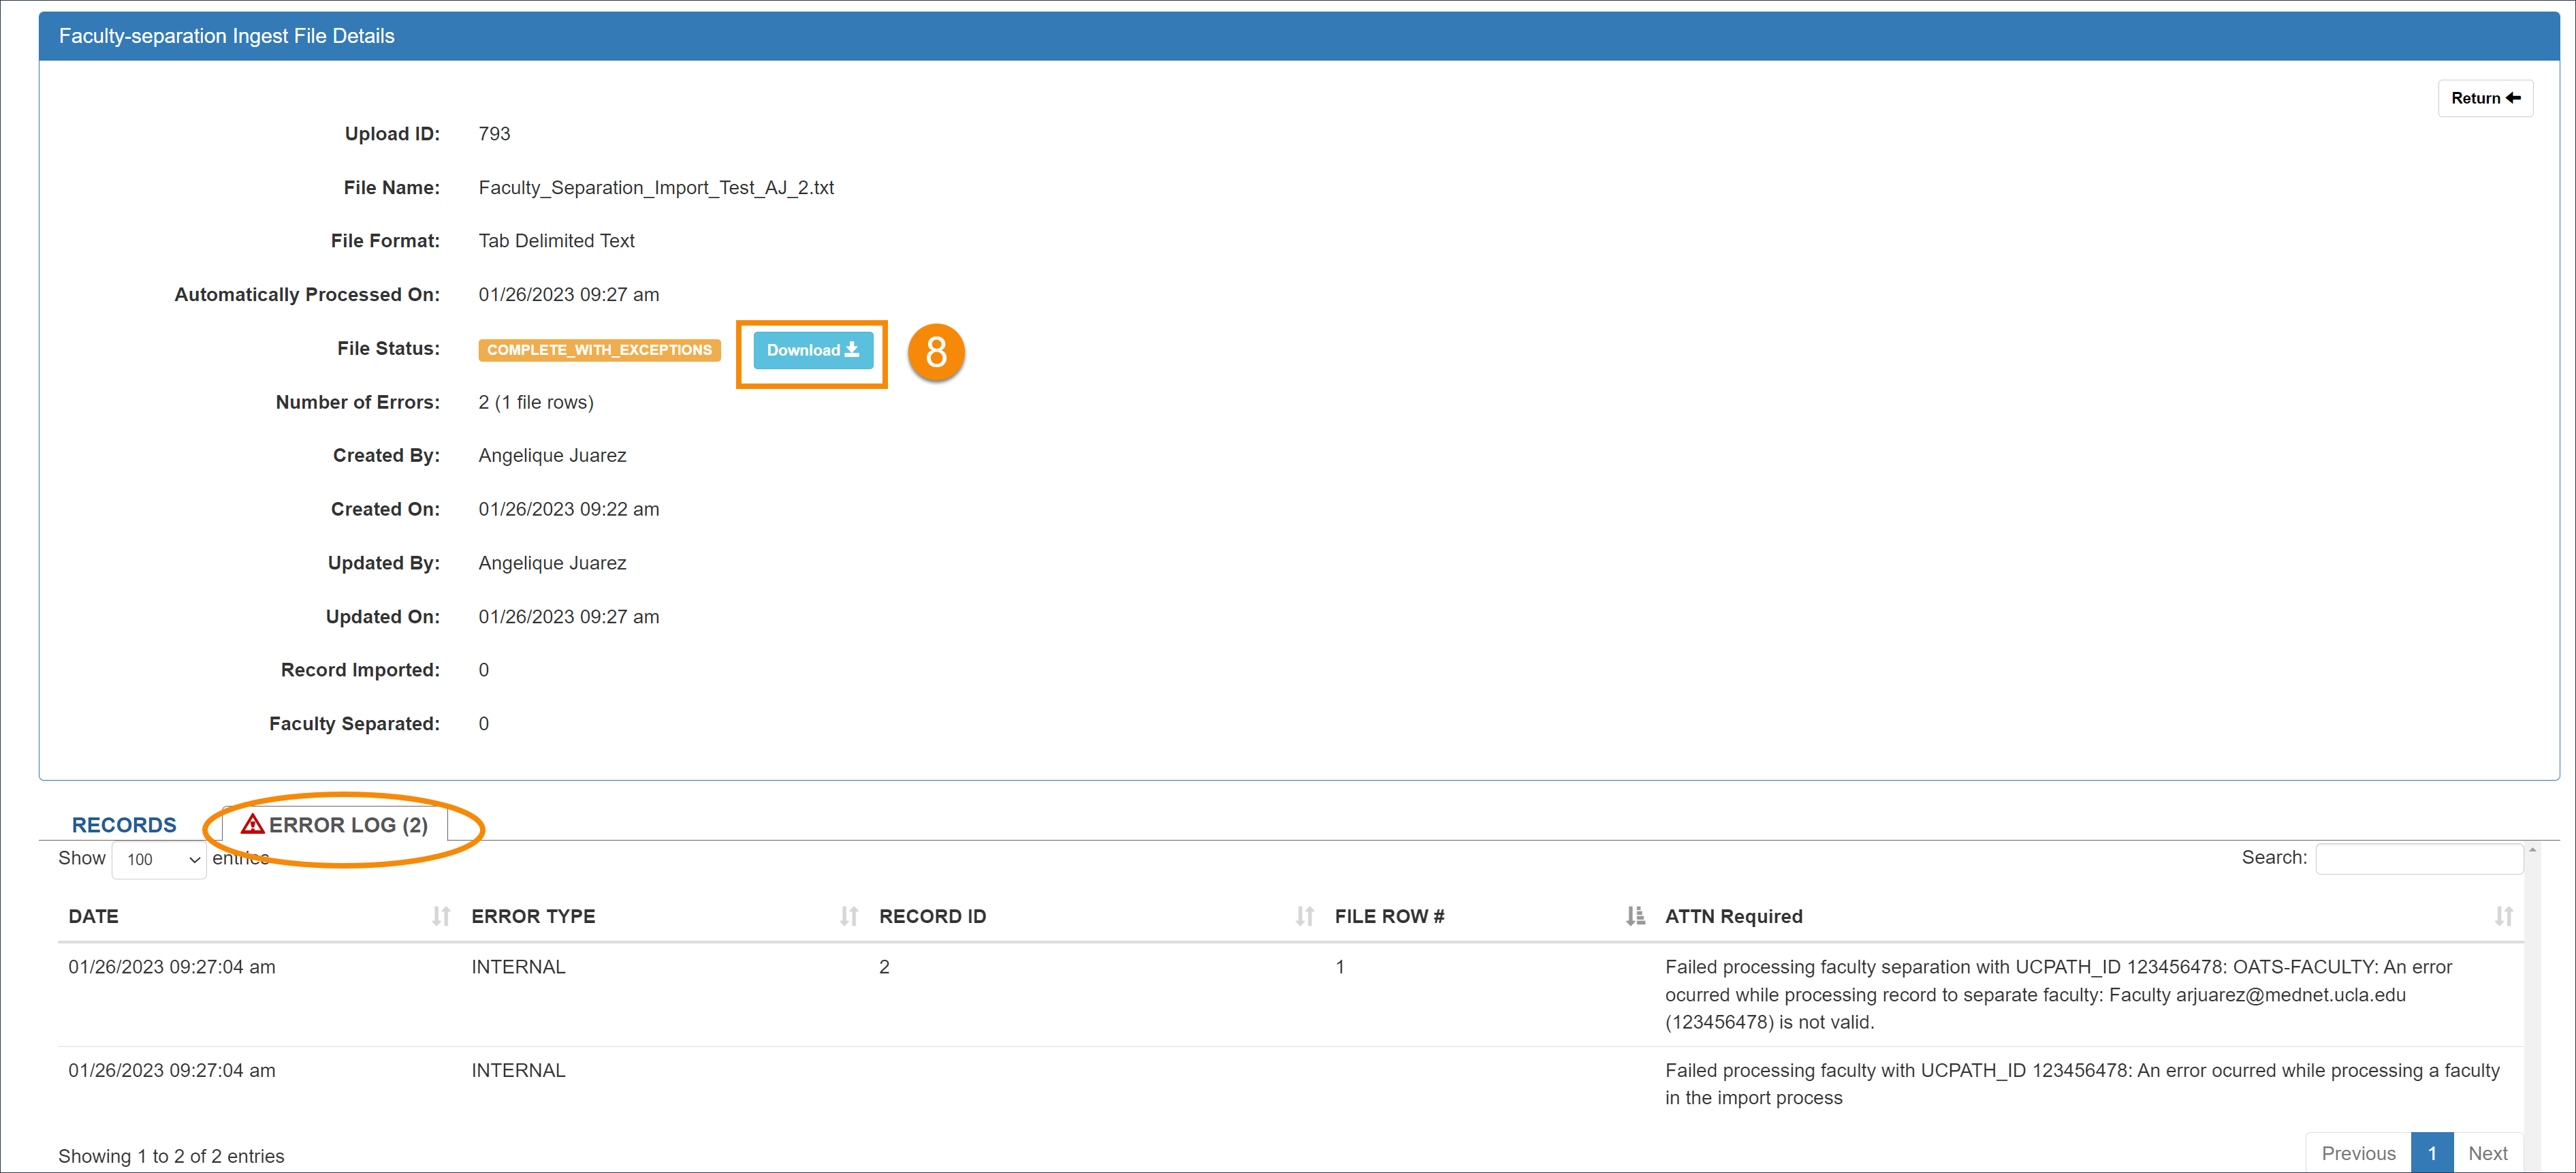
- Complete with Exceptions - The system was unable to process some of the records. To resolve data errors, follow steps 7-10 to fix the issue.
- Click on the file name to view the Ingest File Details log.
- The Records tab will show the records that were processed.
- The Error Log will show any records that were not processed, along with the reason why.
- If the file status is marked as Complete with Exception, click the Download button to retrieve the dataset containing the records that were not processed.

- Open the downloaded data file in Excel. The file will display only the records with errors, and the reason for each error will be listed in the Errors column.
- Fix the errors, and upload the data file.
Related Articles
Application AdministratorData Import Tab Overview
Faculty Data Import
Faculty Separation Data Import
Staff Data Import
Resolving Data Errors
Form Routing Labels / Approvals
End of Fiscal Year Checklist
Campus Help Sites
UC Berkeley
UC Davis
UC Irvine
UC Los Angeles
UC Merced
UC Riverside
UC San Diego
UC San Francisco
UC Santa Barbara
UC Santa Cruz
UC OATS Portals
UC Berkeley
UC Davis
UC Irvine
UC Los Angeles
UC Merced
UC Riverside
UC San Diego
UC San Francisco
UC Santa Barbara
UC Santa Cruz
APM Policies
Academic Personnel & Programs
APM-025- General campus faculty
APM-671- Health sciences faculty
APM-240- Deans
APM-246- Faculty Administrators (100% time)
Last Modified: 2023-01-13 15:11:16.076092-08
